
As a WordPress beginner, to install WordPress on localhost is the first step to starting and building your web design skills with WordPress.
WordPress is a powerful and very easy content management system for web designers and business owners to create responsive and dynamic websites within a short period of time without the need to learn any programming language.
As the most popular web platform, WordPress is already powering up 34% of the entire websites on the internet. Thus, it is a great choice to pick when deciding on which tool to use to create a website.
If you are new to the WordPress community, it is advisable to start creating a WordPress website or blog on localhost before moving to create one on a live site. When you are done creating your website on localhost, you can learn how to migrate WordPress files from localhost to live server with this step-by-step guide.
Installing WordPress on a local server is very easy. It is the first step to creating a personal blog or responsive website for your business on localhost. Localhost here refers to your Windows or Mac machine.
In this post, I will guide you on how to install WordPress locally in 5 easy steps:
- Download, Install and run Xampp.
- Download WordPress setup files.
- Create a Database on localhost.
- Configure and install WordPress files locally.
- Upload theme and install plugins in WordPress.
So, let’s begin with this popular question.

Why do you need to install WordPress on localhost?
A site in a localhost environment is basically for personal purposes, not for users or an audience. The only person who can see and use the site is you! So, why does anyone need to build a site in localhost?
The answer is already given in the above paragraph. Before going live with our site, we should learn the basics, see the structure and test the output of our developed product.
A localhost site lets us check and experience the updates, changes, and settings to be sure about the final outputs. Here are the steps:
Step #1: Download, Install and Run Xampp
For you to install WordPress on localhost using xampp, you start with downloading a local server to your computer that will help you run your WordPress site.
This is because WordPress is built with a server-side programming language (PHP). Which helps you make your website dynamic and able to change data at will. The recommended local server we are going to use in this guide is called Xampp.

XAMPP is a free and open-source cross-platform web server solution. Consisting mainly of the Apache HTTP Server, MariaDB database, and interpreters for scripts written in the PHP and Perl programming languages.
Download the latest version of Xampp software for your particular operating system and let’s move forward with installing Xampp on your computer.

Locate the folder/directory where the xampp software is downloaded to. Select the xampp software to install.
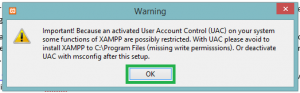
Click “OK” or try to deactivate all antivirus programs installed on your PC, to enable the smooth installation of the xampp software.
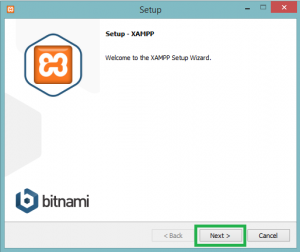
Click “Next” to continue with the installation.

Make sure the following checkboxes are being checked as shown above and click “Next”.

Make sure there is no other folder named xampp in your C:\ drive directory and click “Next”.
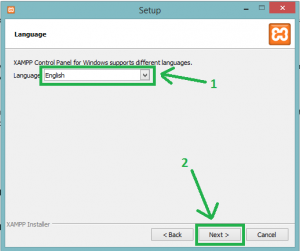
Select your preferred language you would like to use when working with the xampp control panel.

Lastly, click “Next” to allow complete installation of the software to your computer.

Wait for up to 7 – 13 minutes for the software to unpack the xampp setup files to your “C:\” directory.

Click “Finish” to complete the setup and start the xampp control panel.

After the complete installation and the control panel is now opened, “Start” the Apache local server and the MySQL database by clicking both start buttons in front of each.

Congratulations! You have completed the XAMPP installation process!
Step #2: Download WordPress Setup Files
To create a website using WordPress requires you to also download and install WordPress configuration files from their official website.

You can download the latest version of the WordPress setup folder from the wordpress.org website. People are often confused about the differences between WordPress and WordPress.com.
There is a great difference between the wordpress.org website and the wordpress.com website. Check here to learn the difference between wordpress.com and wordpress.org.

Locate the downloaded zipped WordPress folder and unzip it to the same directory.

After extracting the zipped folder, move the newly extracted WordPress folder to the htdocs folder located in the xampp directory just installed. I.e. “C:\xampp\htdocs”.

Rename the moved WordPress folder to a name you desire to use as your website name. Note: When renaming, do not add spaces between the words. It is advisable to join words with a hyphen character “-” or underscore character “_” when renaming your WordPress folder.

E.g. You can rename from “wordpress” to “mynewwebsite” or “my-new-website” or “my_new_website”. But not “my new website”.
Also, make sure to use all lowercase letters when renaming the WordPress folder.
Step #3: Create a Database on Localhost
Now, let’s create a database in WordPress localhost to hold all our WordPress data and any other changes made by users to the WordPress site.
To create a new database on localhost with xampp, open your browser.

In the address bar of your browser, insert the URL: “localhost/phpmyadmin” to open the xampp MySQL database dashboard. Note: Ensure that your MySQL server is running in the xampp control panel as stated above.

Click “New” on the left side panel to add a new database to existing ones.

Add a new database name in the input field (preferably the name of your new WordPress website) and click create.
That’s all we need to create a database in WordPress localhost.
Step #4: Configure and Install WordPress Files Locally
Once you are done creating a database for your website in localhost, it’s time to configure and install the WordPress setup files you downloaded earlier.
To start configuring your WordPress website, insert the URL “localhost/mynewwebsite” in the address bar of your browser. Note: replace “mynewwebsite” with the name of your WordPress folder.

Select your preferred language and click “Continue”, to move to the next step.

Read the instructions to know what you need, to continue with the WordPress setup and click “Let’s go!”.
Now, it’s time to provide the details of your database to enable a successful connection with your WordPress platform. (follow these steps carefully).

In the “Database Name” input field, insert the name of your database created earlier (mine is ‘mynewwebsite’).
The “Username” input field should be changed to “root”.
The “Password” input field should be left empty or blank.
The “Database Host” input field should be left as is (No need to change its value).
The “Table Prefix” input field should be left as is also (No need to change its value).
Click “Submit” after completing the database connection details to continue with the installation.

Click on “Run the installation” to move to the next step.

Provide the details needed for login and the complete installation of WordPress on localhost to use WordPress offline.
After you are done filling in the necessary details, click “install wordpress” to finally install WordPress on localhost for free. Note: copy your username and password data that you filled above into a text file, to enable easy access whenever needed.

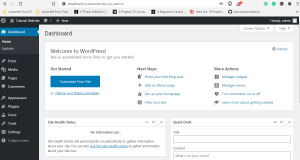
Congratulations! You have completely installed WordPress on localhost. Click the “Log In” button to move to the login form for authentication.

Provide the username or email address and password you added when installing WordPress. And click “Login” to view your WordPress dashboard.
Step #5: Upload Theme and Install Plugins in WordPress
After a complete setup of your WordPress configuration files, it’s time to view how the default WordPress platform or theme looks like.
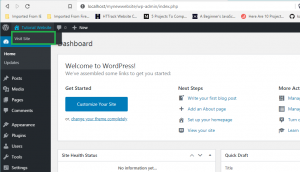
To view how your website would look like to users, hover across the name of your site at the top left-hand corner in your admin dashboard. You would see a dropdown, saying “Visit Site”. Click on it to view your website or enter the URL: “localhost/mynewwebsite” in the address bar of your browser. (Note: replace “mynewwebsite” with the name of your WordPress folder).
To go back to your WordPress admin dashboard, add “/wp-admin” to the URL already in the address bar of your browser. E.g. “localhost/mynewwebsite/wp-admin” (Note: replace “mynewwebsite” with the name of your WordPress folder).
How to Add a Theme or Template to Your WordPress Site
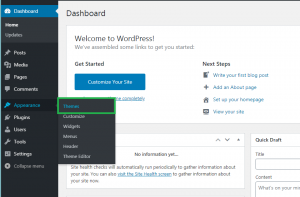
To use a new theme or WordPress template on your website, you need to install a WordPress theme on localhost. On the left sidebar of your admin dashboard, click on “Appearance”. You can also hover on the “Appearance” link to see a dropdown list. In it click on “Themes” to go to the themes page.
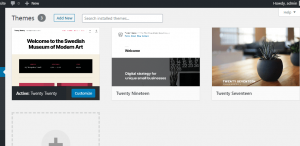
You can select any of the already-made themes provided by WordPress by hovering over it and clicking on the “Activate” button to make it the current theme.

Or preferably, you can add a downloaded theme by clicking on the “Add New” button to move to the Theme Install page. The best platform to get and select any WordPress templates of your choice for any industry when creating your websites is Astra WordPress Themes. Download a free Astra WordPress Theme now.

Click on “Upload Theme” to add a zipped folder of your downloaded theme.
After uploading/installing it, activate it by hovering on it and clicking on the “Activate” button to make the current theme to be used.
To view how your website looks like now with a new theme, open a new tab in your browser and enter the URL: “localhost/mynewwebsite” in the address bar. Note: replace “mynewwebsite” with the name of your WordPress folder.
How to Add Plugins to Your WordPress Site

To make creating your website easy, you need to install WordPress plugins on localhost. Adding a plugin to your WordPress website is as easy as installing a theme. At the left sidebar panel, hover on the “Plugins” link to get a dropdown list. And then click “Add” to move to the plugin’s add page.
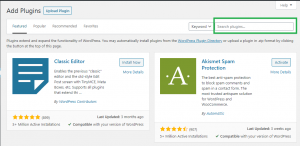
You can search for the desired plugin in the search bar or see a list of must-have plugins for WordPress sites.

When you’ve found a plugin, click on “Install Now” to install it.
After it has completed its installation, click the “Activate” button to activate the plugin and start enjoying its features.
Conclusion
Installing WordPress on your computer is a very straightforward process. Even the most experienced developers start by setting up WordPress locally before moving it online.
Installing WordPress on localhost is easy. And it takes a few steps downloading a xampp software, downloading the WordPress setup/configuration file, creating a database to hold data for your WordPress site, configuring and installing the WordPress files, uploading a WordPress theme and installing different WordPress plugins to add exciting features to your WordPress website.
Once you learn how to install WordPress on localhost, you can create a lot of WordPress websites for different industries at your own convenience.
Note: To create many WordPress sites on localhost with xampp, you don’t need to delete your previous one. Just extract a new WordPress folder from the previously downloaded WordPress zipped file and move it into your htdocs folder in the C:\xampp directory to join the previous ones. And then create a new database as described in the steps above.
After you are done creating your superb designs on localhost, follow this guide to learn how to migrate WordPress from localhost to live server without breaking your WordPress site or causing any harm to your online server.
If you like this article, Kindly like our Facebook, Twitter and Instagram pages to receive more helpful tips about WordPress. Also, check out our amazing affordable web design and digital marketing services to help triple customers to your business now.
Lastly, don’t forget to share with friends on all social platforms to help them begin their web design journey as a WordPress designer. Good luck!
Once you learn how to install WordPress on localhost, I would like to know: What type of site are you going to create with this newly found knowledge? Feel free to share it in the comments!
“Disclosure: Some of the links in this post are “affiliate links”. This means if you click on the link and purchase the item, I will receive an affiliate commission. Thank You”.
Attractive portion of content. I merely stumbled upon your weblog and in accession capital to assert that I get in fact loved account your weblog posts. Anyway I will probably be subscribing to your augment and even I success you get admission to constantly rapidly.
Always i used to read smaller content that also clear their motive, and that is also happening with this paragraph which I am reading at this place.
This is very fascinating, You are an overly skilled blogger. I have joined your feed and look forward to searching for extra of your fantastic post. Additionally, I have shared your site in my social networks
I’ve learned some good stuff here. Certainly value bookmarking for revisiting.
I’m surprised by how so much effort you put to create the sort of wonderful informative website.
I for all time emailed this website’s post page to all my associates, because I like to read it after that my contacts will too.
Hi, I log on to your blog like every week. Your story-telling style is awesome, keep doing what you’re doing!
I constantly emailed this webpage post page to all my associates, since if like to read it then my links will too.
Hi there to everybody, it’s my first pay a visit to this webpage; this website carries awesome and truly good material designed for readers.
I am sure this article has touched all the internet viewers, its really really nice article on building up a new web site.
You could certainly see your expertise within the article you write. The sector hopes for even more passionate writers such as you who aren’t afraid to mention how they believe.
Always go after your heart.
Very good info. Lucky me I found your site by chance (stumble upon).
I have bookmarked it for later!
For latest news you have to pay a quick visit internet and on the web I found this website as a most excellent site for most recent updates.
Have you ever thought about publishing an e-book or guest authoring on other websites?
I have a blog based on the same topics you discuss and would love to have you share some stories/information. I know my visitors would appreciate your work. If you’re even remotely interested, feel free to send me an e mail.
It’s an amazing paragraph designed for all the online people; they will take advantage from it I am sure.
Fine way of describing, and nice piece of writing to obtain facts regarding my presentation focus, which i am going to convey in university.
You can definitely see your skills in the work you write.
The sector hopes for even more passionate writers like you who are not afraid to say how they believe. At all times follow your heart.
This is very interesting, You are a very skilled blogger.
I have joined your RSS feed and look forward to seeking more of your great post.
Also, I have shared your website on my social networks!
I do not even know how I ended up here, but I thought this post was good. I don’t know who you are but definitely you’re going to a famous blogger if you are not already 😉 Cheers!
Good post. I certainly love this website. Thanks!
Right here is the right site for anybody who would like to find out about this topic. You understand so much it’s almost tough to argue with you (not that I really would want to…HaHa). You certainly put a fresh spin on a topic that has been discussed for many years.
Excellent stuff, just excellent!
Appreciate the recommendation. Let me try it out.
Hi, I read your blog like every week. Your story-telling style is awesome, keep up the good work!
Thanks a lot for sharing this with all of us you really know what you are speaking approximately!
Bookmarked. Please also seek advice from my site =).
We can have a link alternate contract between us
I like the helpful info you provide in your articles. I’ll bookmark your blog and check again here frequently. I am quite certain I will learn a lot of new stuff right here! Good luck for the next!
you are in point of fact an excellent webmaster. The website loading pace is incredible. It seems that you’re doing any distinctive trick.
Also, The contents are masterpieces. you’ve done an excellent job on this topic!
You’re so awesome! I do not suppose I have read a single thing like this before. So wonderful to find somebody with original thoughts on this issue.
Seriously.. thank you for starting this up. This site is one thing that is needed on the internet, someone with some originality!
This design is spectacular! You certainly know how to keep a reader entertained. Between your wit and your videos, I was almost moved to start my own blog (well, almost…HaHa!) Great job. I really loved what you had to say, and more than that, how you presented it. Too cool!
Hello! I’ve been following your weblog for a while now and finally got the courage to go ahead and give you a shout out from New Caney Tx! Just wanted to tell you to keep up the great work!
I read this post fully on the topic of the difference between the latest and earlier technologies, it’s a remarkable article.
We are a group of volunteers opening a new scheme in our community.
Your website provided us with valuable information to work on. You have done a formidable job and our whole community will be thankful to you.
This design is incredible! You obviously know how to keep a reader entertained. Between your wit and your videos, I was
almost moved to start my own blog (well, almost…HaHa!) Excellent job. I really loved what you had to say, and more than that, how you presented it.
Too cool!
Some genuinely interesting details you have written. Aided me a lot, just what I was looking for :D.
Very nice post. I just stumbled upon your blog and wanted to say that I have truly enjoyed browsing your blog posts. After all I will be subscribing to your feed and I hope you write again soon!|
Thank you a bunch for sharing this with all people you really realize what you are speaking about! Bookmarked. Kindly additionally consult with my website =). We could have a link exchange agreement among us
Woah! I’m loving the template/theme of this website. It’s simple, yet effective. A lot of times it’s very difficult to get that “perfect balance” between usability and visual appearance. I must say you’ve done a superb job with this.
In addition, the blog loads extremely quickly for me on Internet explorer. Outstanding Blog!
You’re so cool! I do not believe I’ve truly read through anything like this before. So nice to discover someone with some unique thoughts on this subject.
Really.. thanks for starting this up. This website is one thing that is required on the internet, someone with a bit of originality.
Very nice post. I certainly appreciate this site.
Keep writing!
Your competence beams by means of, and also your useful recommendations are actually a goldmine for visitors wanting to improve their skills.
Your passion for the subject matter is evident and uplifting.
which version will be best for IIS server, 3.5 .Net Framework or 4.5 .Net Framework?, actully we are getting error run wordpress website include with ASP .Net code.