
To move WordPress from localhost to live server can be time-consuming, intimidating and risky (especially if you are a newbie to WordPress). However, It’s really good to build a website locally for speedy development using software like XAMPP, WAMP (for Windows) or MAMP (for Mac). I recommend using XAMPP as it is very easy to use.
Also, building a website locally allows you to test different themes, templates and plugins, and also saves you from unnecessary headaches of your site breaking while troubleshooting and so on.
Once you are satisfied with the design of your website on localhost, you can migrate WordPress from localhost to server in minutes and share your designs with the world as quickly as possible. It sounds tough but very easy.
Meanwhile, in this guide, I will give you a step-by-step walkthrough on how to move a WordPress website from localhost to live server manually within your cPanel dashboard, without the use of a WordPress plugin.
Note that in these steps, to move WordPress to a new server, you have to do the following:
- Migrate WordPress files of your local site to the live site.
- Move WordPress database from localhost to server.
Now, let’s get started:
Step #1

First of all, you need a web hosting plan to install and upload your WordPress website to the internet. I recommend using Gitservers. They offer affordable and reliable fast web hosting services you’ll ever get for WordPress and non-WordPress websites. Create a free hosting account now to get the best result with ease while transferring WordPress from localhost to server.
Step #2
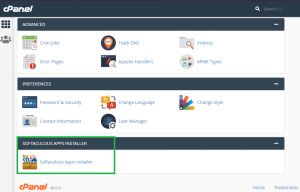
Log into your cPanel account and scroll down to the section called “Softaculous Apps Installer”. Click on the WordPress icon to install WordPress on a live server. Learn how to install WordPress in one simple click.
Step #3

After installing WordPress, click on File Manager in your cPanel dashboard. Navigate to the “public_html”/root There you will see your WordPress configuration files and folders (i.e. if WordPress is installed in the root folder).
Step #4

Now, go back to your localhost website files on your desktop or local drive. Navigate into the wp-content folder.
Step #5

Create a new folder, and rename it to be called “wpitems”.
Step #6

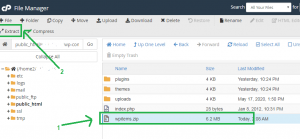
Select the plugins, themes and uploads folders, then copy these three folders into the newly created “wpitems” folder. Lastly, compress (zip) the “wpitems” folder. Learn how to compress (zip) a folder in your computer.
Step #7
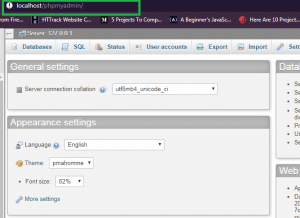
In your browser, go to the localhost database by entering “localhost/phpmyadmin” URL in the address bar.
Step #8

Select and open the database currently being used by your localhost WordPress site (that is your WordPress site still in your computer).
Step #9
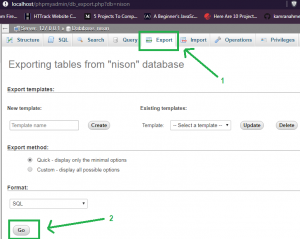
Navigate to the Export tab. Scroll to the bottom of the page and click the Go button. Your localhost WordPress site database will be exported in a “.sql” file format.
Step #10


Let’s now complete our WordPress set-up in cPanel. In your website root folder (public_html), Navigate to the wp-content folder. Delete the “plugins”, “themes” and “uploads” folders and click on upload in the top navigation bar.
Step #11

Drag and drop the zipped “wpitems” folder from the localhost files into your browser and wait for it to complete uploading. After its complete upload, go back to the wp-content folder in cPanel and click reload. Now you should see the uploaded compressed (zipped) “wpitems” folder.
Step #12
Select the zipped “wpitems” folder and click on extract in the top navigation bar. After extracting the zipped folder into your wp-content folder, click reload to view your extracted “wpitems” folder.
Step #13

Navigate into the extracted “wpitems” folder. Select the “plugins”, “themes” and “uploads” folder altogether and click move in the top navigation bar.
A pop-up menu will appear, showing the directory to which you want to move these three folders to. Remove the “/wpitems” and click the Move File(s). Navigate back to the “wp-content” folder by clicking “Up One Level”.
Now you should see all three folders recently moved, the zipped “wpitems” folder and the unzipped empty “wpitems” folder. Select and delete both folders labelled “wpitems” (zipped and unzipped).
Now you have the three recently uploaded folders (plugins, themes, uploads) and an index.php file. Great Work, we’re almost done moving WordPress from localhost to live server.

Get free luxurious WordPress themes of any industry for your website and blog. Download a Superb Elegant WordPress Theme now!
Step #14
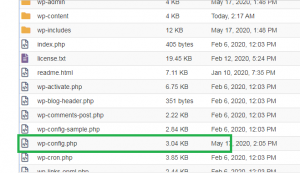
Next, navigate back to your root folder (public_html) and look for a file labelled wp-config. Select it and click “Edit” in the top navigation bar to edit its content.
Step #15
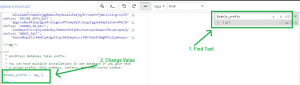
In your wp-config.php file, you will see a lot of codes and comments. Do not be overwhelmed by that. Click CTR + F to find a particular text, in the pop-up shown type “$table_prefix” to find the table prefix of the current live WordPress database.
Change the value to ‘wp_’ or whatever the prefix of your localhost WordPress site database is. For example: ‘wp896_’ to ‘wp_’. And click Save Changes then close.
Step #16
Now, locate the folder where you downloaded the exported localhost database we talked about in “Step #9”. Select it and open it with a text editor or IDE. I recommend using the Sublime Text text editor for beginners as it is light and easy to use (there are other text editors you can use also to achieve this same goal).
After you download and install Sublime Text. Select your exported “.sql” database file, right-click and open with Sublime Text.
Step #17
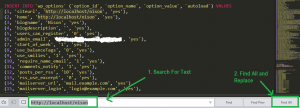
When you open the exported localhost “.sql” file in Sublime Text Editor, you will see a lot of codes. Not to worry again, click CTR + F to find. In the find search bar below type “http://localhost/sitefoldername” and click on Find All. It would select all text relating to “http://localhost/sitefoldername” (replace sitefoldername with your localhost site folder name).
Then replace all highlighted text with your new live WordPress site URL: e.g. “http://newlivewordpresssite.com” (replace newlivewordpresssite with your domain name). And save the file with CTR + S.
Step #18

Go back to the cPanel dashboard, scroll down and click on phpMyAdmin under the Databases section to open the database dashboard. Select and open the live WordPress site database currently in use.
Navigate to the Export tab in the top navigation bar and export the database (just to be safe, though not needed anymore). Then Check all tables in the database and click drop to delete the current tables of the live WordPress site.
Step #19
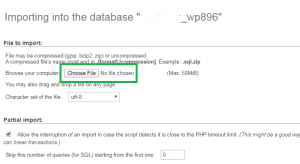
Finally, Navigate to the import tab, Click on the choose file button, and select the newly modified localhost WordPress site database (make sure to rename the localhost database file to the new live site database name). Scroll down and click “Go” to import.
Step #20
Now you can reload your live WordPress site in your browser to ensure everything is up and running smoothly.
That’s all, you have successfully migrated WordPress from a local server to a live site!
P.S: To log in to your new live site /wp-admin dashboard, Use the login information used when installing the WordPress site on localhost.
Conclusion
To move WordPress from localhost to a live site might seem difficult and daunting at first sight. However, taking the right steps with guidance correctly will get you your desired result in no time as it takes only a few steps to do it manually.
Congratulations to you if you made it this far in moving WordPress from localhost to server. You should know that you are no more a newbie to WordPress as far as taking these steps correctly and carefully.
If you like this article, Kindly like our Facebook, Twitter and Instagram pages to receive more helpful tips about WordPress. Also, check out our amazing affordable web design and digital marketing services to help grow your business at a fast pace. And lastly, don’t forget to share with friends on all social platforms to save them from unnecessary headaches. Good luck!
Are you still having problems while trying to move the WordPress website from localhost to the live server, or you are stuck in one of the steps above? Leave a comment below, and we would respond to fix your needs as soon as possible.
“Disclosure: Some of the links in this post are “affiliate links”. This means if you click on the link and purchase the item, I will receive an affiliate commission. Thank You”.
Not everyone seems to be fortunate sufficient to have a quiet sleeping setting.
Awesome guide!! This worked perfectly for me.
Thanks a lot…